Friday, 19 April 2024

Fun with MikroTik using Python || Automate Everything

Fun with MikroTik put all commands and router's ip in a text file and run the script.


It's really boring work to do some specific same configuration that need to do in all the mikrotik. Like creating user, creating  queue, creating filter rules, mangle rules, address list adding, raw filter, ip pool, log configure, time zone, ntp etc much more. Individually need to login a mikrotik router via winbox/ssh/telnet.


Python gives us better solution. 

Demo given below and script Google drive download link:  Script Drive Link


Just download and install python version 3.10.0.  And install netmiko packege/module verision 4.3.0 using pip command. See python documentation or my previous blogpost.


Create a new folder name Mikrotik Automation.  inside folder create files like below


In command_file.txt please put all the command that you want to execute in all the mikrotik router. I have added some commands 

    1. ip pool
    2. PPPoE Profile
    3. Firewall mange rule
    4. Firewall Filter rule for invalid syn,fin,ack, Filter rule for drop Brute Force             Attack, port  scanner, ssh attack,  address list, 
    5. User Creation
    6. Ip services configure
    7. Log Configure
    8. Queue type and Simple Queue configure
    9. Clock, Time zone, Traffic-flow
    10. Graphing

Command_file.txt contains 91 of command that will execute like below


In the host_file.txt add all the mikrotik router loopback ip's.  I have added some ip address of my lab mikrotik router 


Almost Eleven router there i will automate the above configuration. In host_file contains like this.


In Fun-with-mikrotik.py file paste below code and save


from netmiko import ConnectHandler
import time
def main():
    username = input('Please Enter Username: ')
    password = input('Please Enter Password: ')
    # Define device parameters
    with open('host_file.txt', 'r') as file:
        host_addresses = file.readlines()
    
    # Read commands from the text file
    with open('command_file.txt', 'r') as file:
        commands = file.readlines()
    
    mikrotik = {
        'device_type': 'mikrotik_routeros',
        'username': username,
        'password': password,
    }
    
    # Establish SSH connection
    for host in host_addresses:
        mikrotik['host'] = host.strip()
        try:
            with open('log.txt', 'a') as log_file:  # Open log file in append mode
                with ConnectHandler(**mikrotik) as net_connect:
                    # Send commands to the router
                    output = net_connect.send_config_set(commands)
                    time.sleep(10)
                    print(f'Commands executed at: {host.strip()}')
                    log_file.write(f'Commands executed at: {host.strip()}\n')
        except Exception as e:
            with open('log.txt', 'a') as log_file:  # Open log file in append mode
                log_file.write(f'Error executing commands at: {host.strip()}\n')
                print("An error occurred:", e)
if __name__ == "__main__":
    main()
    input('Press enter to close.')


Double Click on the file to execute. And enter username and password of your mikrotik. Here mine is admin/admin


Just wait 2 minutes. And you will see the output like this. 


Don't worry those ip's are not reachable the script will notify you by loggin all the log in log.txt file. Contains all the log like below


If this blogpost found helpfull don't forget to share with other's. For any help can contact any time.

Thursday, 18 April 2024

Mikrotik Automation With Python || Automate Everything


Tricky python script to get all the ip addresses with interface name that statically added in the mikrotik. 

Output:


Requirements:
    1. Python Version: Python 3.10.0
    2. Paramiko Package/Module:  Paramiko 3.4.0
    3. Pip Version: Pip 21.2.3

Download Python from python official page install: Python-3.10.0


While install don't forget to tick on Add to variable path


After install open cmd and run command verify python version

                    C:\Users\shaharul.islam>python --version
            Python 3.10.0

Then install paramiko package using below command:

        C:\Users\shaharul.islam> pip install paramiko


Create a new file with extension .py  mikrotik.py 

Paste below script and save. Google Drive Link : Mikrotik-SSH.py


import paramiko
import re


def ssh_connect(hostname, username, password):
    try:
        # Create SSH client
        ssh_client = paramiko.SSHClient()
        ssh_client.set_missing_host_key_policy(paramiko.AutoAddPolicy())
        # Connect to the SSH server
        ssh_client.connect(hostname, username=username, password=password,timeout=6) 
        # Return the SSH client object
        return ssh_client
    except paramiko.AuthenticationException as e:
        print("Authentication failed:", e)
    except paramiko.SSHException as e:
        print("SSH connection failed:", e)
    except paramiko.BadHostKeyException as e:
        print("Host key could not be verified:", e)
    except Exception as e:
        print("An error occurred:", e)
        # Handle other exceptions here
        # For example, network errors, connection timeout, etc.

def main():
    hostname = input("Enter Mikrotik Router IP: " )
    username = 'admin'
    password = ''

    mt_ssh = ssh_connect(hostname, username, password)
    if mt_ssh:
        #command here
        stdin, stdout, stderr = mt_ssh.exec_command('ip address export')

        # Regular expression pattern to match IP address, interface, and disable status
        ip_interface_pattern = r'add\s+address=(\d+\.\d+\.\d+\.\d+(/\d+)?\b)\s+(?:comment=\S+\s+)?(?:disabled=(\w+)\s+)?interface=(\S+)\s+(?:network=\d+\.\d+\.\d+\.\d+/\d+\s+)?'

        # Process each line of the command output
        for line in stdout:
            output_line = line.strip()
            
            # Skip lines that don't start with "add address"
            if not output_line.startswith("add address"):
                continue
            
            # Find matches in the current line
            match = re.match(ip_interface_pattern, output_line)
            
            # Print the result if a match is found
            if match:
                ip_address = match.group(1)
                disabled_status = match.group(3) if match.group(3) else "no"
                interface = match.group(4)
                print(f"IP Address: {ip_address}, Interface: {interface}, Disabled: {disabled_status}")
                mt_ssh.close()

if __name__ == "__main__":
    main()
    input("Press enter to close")


N.B: Python code is indent sensitive. So before every line of code ensure proper indent. Above code is perfectly described by given comment before line start. Router username and password predefined in code. 


Save and run it simply double click on the file.

Enter Mikrotik router ip address:


And the output is given below


Let's verify the ip addresses. I have already added some ip addresses before creating this script. After login router let's see ip addresses.


By Modifying above code can make power full script to make mikrotik automation. Here's just given an example. If you have big network with mikrotik. you can find which IP address used in which mikrotik simply modifying above script.

Also modifying above code you can done Specific task that need to create in multiple router. If this post found help full then don't forget to share with other's. Need help you can ask....


Sunday, 7 April 2024

Wireguard VPN configure in mikrotik router os 7

 Wireguard VPN configure in mikrotik router os 7


First Create a wireguard logical interface

    /interface wireguard
  add listen-port=13231 mtu=1420 name=wireguard1

Or


Then add a ip address in wireguard interface.

    /ip address
   add address=10.10.10.1/24 interface=wireguard1 network=10.10.10.0


Or


Then as usual create masqurade or src-nat nat rule and DNS.

    /ip dns
    set servers=8.8.8.8
    /ip firewall nat
    add action=masquerade chain=srcnat
    

Now Create peer configuration

    /interface wireguard peers
    add allowed-address=10.10.10.2/32 interface=wireguard1 public-       key="Peer Public Key"


Now configure in wireguard client device and configure as below for android down from google play store and for windows : Download or visit https://www.wireguard.com/install/


Friday, 2 February 2024

Fast and Speedtest reday script || Mikrotik

Fast and Speedtest reday script

/ip firewall address-list

add address=10.0.0.0/8 list=Client-IP

add address=103.103.42.0/24 list=Fast-Speedtest

add address=103.125.178.0/24 list=Fast-Speedtest

add address=42.201.253.0/24 list=Fast-Speedtest

add address=103.135.44.0/24 list=Fast-Speedtest

add address=118.107.138.0/24 list=Fast-Speedtest

add address=103.113.100.0/24 list=Fast-Speedtest

add address=203.135.29.0/24 list=Fast-Speedtest

add address=115.167.73.0/24 list=Fast-Speedtest

add address=202.69.12.0/24 list=Fast-Speedtest

add address=58.65.177.0/24 list=Fast-Speedtest

add address=103.55.68.0/24 list=Fast-Speedtest

add address=58.65.171.0/24 list=Fast-Speedtest

add address=103.12.198.98 list=Fast-Speedtest

add address=182.176.176.0/24 list=Fast-Speedtest

add address=119.30.107.0/24 list=Fast-Speedtest

add address=115.186.185.0/24 list=Fast-Speedtest

add address=23.246.54.0/23 list=Fast-Speedtest

add address=54.154.202.0/23 list=Fast-Speedtest

add address=45.57.50.0/23 list=Fast-Speedtest

add address=198.38.114.0/23 list=Fast-Speedtest

add address=103.15.246.3 list=Fast-Speedtest

add address=151.101.10.219 list=Fast-Speedtest

add address=23.74.247.112 list=Fast-Speedtest

add address=103.15.40.4 list=Fast-Speedtest

add address=203.76.99.30 list=Fast-Speedtest

add address=103.58.73.2 list=Fast-Speedtest

add address=119.18.150.8 list=Fast-Speedtest

add address=103.15.164.23 list=Fast-Speedtest

add address=103.43.148.67 list=Fast-Speedtest

add address=192.168.10.2 list=Fast-Speedtest

add address=118.179.75.213 list=Fast-Speedtest

add address=123.253.37.2 list=Fast-Speedtest

add address=182.160.96.0/24 list=Fast-Speedtest

add address=103.15.40.0/24 list=Fast-Speedtest

add address=103.213.237.62 list=Fast-Speedtest

add address=210.176.156.49 list=Fast-Speedtest

add address=210.176.156.48 list=Fast-Speedtest

add address=151.101.54.114 list=Fast-Speedtest

add address=151.101.42.114 list=Fast-Speedtest

add address=151.101.10.214 list=Fast-Speedtest

add address=151.101.26.114 list=Fast-Speedtest

add address=151.101.0.143 list=Fast-Speedtest

add address=151.101.0.84 list=Fast-Speedtest

add address=125.56.237.3 list=Fast-Speedtest

add address=104.84.156.138 list=Fast-Speedtest

add address=59.151.128.157 list=Fast-Speedtest

add address=23.219.132.176 list=Fast-Speedtest

add address=23.198.124.11 list=Fast-Speedtest

add address=23.77.26.81 list=Fast-Speedtest

add address=182.79.223.0/24 list=Fast-Speedtest

add address=23.9.187.175 list=Fast-Speedtest

add address=52.33.112.234 list=Fast-Speedtest

add address=52.41.203.109 list=Fast-Speedtest

add address=69.173.159.0/24 list=Fast-Speedtest

add address=104.79.117.49 list=Fast-Speedtest

add address=104.118.129.134 list=Fast-Speedtest

add address=104.122.15.153 list=Fast-Speedtest

add address=104.122.11.167 list=Fast-Speedtest

add address=104.122.8.110 list=Fast-Speedtest

add address=104.121.255.145 list=Fast-Speedtest

add address=speedtest.net list=Fast-Speedtest

add address=Fast-Speedtest list=Fast-Speedtest

add address=151.101.1.130 list=Fast-Speedtest

add address=184.26.196.191 list=Fast-Speedtest

add address=173.239.53.18 list=Fast-Speedtest

add address=151.101.196.64 list=Fast-Speedtest

add address=151.101.193.21 list=Fast-Speedtest

add address=151.101.10.208 list=Fast-Speedtest

add address=151.101.10.109 list=Fast-Speedtest

add address=151.101.9.108 list=Fast-Speedtest

add address=151.101.2.133 list=Fast-Speedtest

add address=151.101.2.110 list=Fast-Speedtest

add address=151.101.2.109 list=Fast-Speedtest

add address=151.101.1.186 list=Fast-Speedtest

add address=23.74.243.73 list=Fast-Speedtest

add address=34.208.20.104 list=Fast-Speedtest

add address=35.172.96.212 list=Fast-Speedtest

add address=192.229.237.182 list=Fast-Speedtest

add address=151.101.65.21 list=Fast-Speedtest

add address=151.101.129.21 list=Fast-Speedtest

add address=151.101.10.2 list=Fast-Speedtest

add address=151.101.8.81 list=Fast-Speedtest

add address=151.101.2.114 list=Fast-Speedtest

add address=128.1.97.163 list=Fast-Speedtest

add address=104.118.121.11 list=Fast-Speedtest

add address=199.232.237.51 list=Fast-Speedtest

add address=151.101.126.91 list=Fast-Speedtest

add address=151.101.114.91 list=Fast-Speedtest

add address=151.101.130.91 list=Fast-Speedtest

add address=151.101.2.91 list=Fast-Speedtest

add address=151.101.1.42 list=Fast-Speedtest

add address=182.79.164.0/24 list=Fast-Speedtest

add address=23.47.232.222 list=Fast-Speedtest

add address=52.42.104.145 list=Fast-Speedtest

add address=52.41.214.164 list=Fast-Speedtest

add address=118.215.155.65 list=Fast-Speedtest

add address=44.233.205.57 list=Fast-Speedtest

add address=35.155.65.240 list=Fast-Speedtest

add address=100.20.17.138 list=Fast-Speedtest

add address=202.150.221.0/24 list=Fast-Speedtest

add address=182.79.161.0/24 list=Fast-Speedtest

add address=182.79.245.0/24 list=Fast-Speedtest

add address=182.79.160.0/22 list=Fast-Speedtest

add address=182.79.164.0/22 list=Fast-Speedtest

add address=45.57.50.0/24 list=Fast-Speedtest

add address=45.57.51.0/24 list=Fast-Speedtest

add address=108.159.58.0/24 list=Fast-Speedtest

add address=69.173.158.0/24 list=Fast-Speedtest

add address=182.79.164.2 list=Fast-Speedtest

add address=182.79.164.165 list=Fast-Speedtest

add address=182.79.164.55 list=Fast-Speedtest

add address=182.79.164.6 list=Fast-Speedtest

add address=182.79.161.233 list=Fast-Speedtest

add address=45.57.51.140 list=Fast-Speedtest

add address=182.79.223.234 list=Fast-Speedtest

add address=45.57.50.142 list=Fast-Speedtest

add address=182.79.223.230 list=Fast-Speedtest

add address=45.57.51.146 list=Fast-Speedtest

add address=45.57.50.150 list=Fast-Speedtest

add address=45.57.51.153 list=Fast-Speedtest

add address=23.246.55.163 list=Fast-Speedtest

add address=45.57.51.142 list=Fast-Speedtest

add address=49.44.61.0/24 list=Fast-Speedtest

add address=103.87.204.0/22 list=Fast-Speedtest

add address=23.246.0.0/18 list=Fast-Speedtest

add address=45.57.0.0/17 list=Fast-Speedtest

add address=37.77.184.0/21 list=Fast-Speedtest

add address=64.120.128.0/17 list=Fast-Speedtest

add address=108.175.32.0/20 list=Fast-Speedtest

add address=185.2.220.0/22 list=Fast-Speedtest

add address=185.9.188.0/22 list=Fast-Speedtest

add address=35.0.0.0/8 list=Fast-Speedtest

add address=182.79.0.0/16 list=Fast-Speedtest

add address=52.35.0.0/16 list=Fast-Speedtest

add address=23.246.0.0/16 list=Fast-Speedtest

add address=37.77.184.0/21 list=Fast-Speedtest

add address=45.57.0.0/17 list=Fast-Speedtest

add address=64.120.128.0/17 list=Fast-Speedtest

add address=66.197.128.0/17 list=Fast-Speedtest

add address=185.2.220.0/22 list=Fast-Speedtest

add address=185.9.188.0/22 list=Fast-Speedtest

add address=198.9.188.0/22 list=Fast-Speedtest

add address=198.38.96.0/19 list=Fast-Speedtest

add address=182.79.223.0/24 list=Fast-Speedtest

add address=182.79.164.0/24 list=Fast-Speedtest

add address=61.8.176.0/20 list=Fast-Speedtest

add address=199.58.164.0/22 list=Fast-Speedtest

add address=131.161.168.0/22 list=Fast-Speedtest

add address=103.101.59.0/24 list=Fast-Speedtest

add address=103.102.42.0/23 list=Fast-Speedtest

add address=23.77.0.0/18 list=Fast-Speedtest

add address=23.246.0.0/18 list=Fast-Speedtest


/ip firewall mangle


add action=mark-packet chain=forward dst-address-list=Fast-Speedtest new-packet-mark=fast-upload passthrough=no src-address-list=Client-IP

add action=mark-packet chain=forward dst-address-list=Client-IP new-packet-mark=fast-download passthrough=no src-address-list=Fast-Speedtest
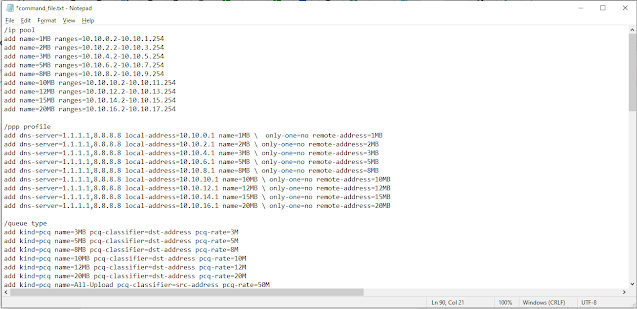
 

/queue type

add kind=pcq name=fast-upload pcq-classifier=src-address pcq-dst-address6-mask=64 pcq-rate=30M pcq-src-address6-mask=64

add kind=pcq name=fast-download pcq-classifier=dst-address pcq-dst-address6-mask=64 pcq-rate=30M pcq-src-address6-mask=64


/queue simple

add name="Fast-Upload-bdix" dst=HTL-BDIX packet-marks=fast-upload queue=fast-upload/fast-download target=""

add name="Fast-Download-bdix" dst=HTL-BDIX packet-marks=fast-download queue=fast-upload/fast-download target=""

/queue simple

add name="Fast-Upload" dst=HTL-INT packet-marks=fast-upload queue=fast-upload/fast-download target=""

add name="Fast-Download" dst=HTL-INT packet-marks=fast-download queue=fast-upload/fast-download target=""

Thursday, 25 January 2024

Creating simple Juniper Plicier || Juniper

 Juniper Plicier:


set firewall policer 100M if-exceeding bandwidth-limit 100m

set firewall policer 100M if-exceeding burst-size-limit 256k

set firewall policer 100M then discard


set logical-systems ggc-rt firewall policer 900MB if-exceeding bandwidth-limit 900m

set logical-systems ggc-rt firewall policer 900MB if-exceeding burst-size-limit 1m

set logical-systems ggc-rt firewall policer 900MB then discard


set logical-systems fna-rt firewall policer 900MB if-exceeding bandwidth-limit 900m

set logical-systems fna-rt firewall policer 900MB if-exceeding burst-size-limit 1m

set logical-systems fna-rt firewall policer 900MB then discard


set logical-systems bdix-rt firewall policer 900MB if-exceeding bandwidth-limit 900m

set logical-systems bdix-rt firewall policer 900MB if-exceeding burst-size-limit 1m

set logical-systems bdix-rt firewall policer 900MB then discard


set logical-systems cdn-rt firewall policer 900MB if-exceeding bandwidth-limit 900m

set logical-systems cdn-rt firewall policer 900MB if-exceeding burst-size-limit 1m

set logical-systems cdn-rt firewall policer 900MB then discard


Juniper BGP Community simple use:

set policy-options community Upstream members 1400:991

set policy-options policy-statement Upstream-Out term 1 from community Upstream

set policy-options policy-statement Upstream-Out term 1 then accept

set policy-options policy-statement Upstream-Out term 5 then reject


set policy-options policy-statement CLIENT-INT-IN term 1 then community add Upstream

set policy-options policy-statement CLIENT-INT-IN term 1 then accept

Juniper to Cisco switch and mikrotik LACP configuration || Juniper || Cisco || Mikrotik

 Juniper to Cisco switch LACP configuration:


Juniper Side:

set chassis aggregated-devices ethernet device-count 20   

[Above line is Mandatory for First time LACP config in Juniper]

set interfaces ae0 description "Bundle-1"

set interfaces ae0 vlan-tagging

set interfaces ae0 aggregated-ether-options link-speed 1g

set interfaces ae0 aggregated-ether-options lacp active

set interfaces ge-0/0/0 gigether-options 802.3ad ae0

set interfaces ge-0/0/1 gigether-options 802.3ad ae0


Cisco Side: 

interface Port-channel1

 switchport trunk encapsulation dot1q

 switchport mode trunk

!

interface GigabitEthernet0/0

 switchport trunk encapsulation dot1q

 switchport mode trunk

 negotiation auto

 channel-group 1 mode active

!

interface GigabitEthernet0/1

 switchport trunk encapsulation dot1q

 switchport mode trunk

 negotiation auto

 channel-group 1 mode active


Juniper to Mikrotik LACP/Bonding configuration: 


Juniper Side: 

As above

Mikrotik Side: 


/interface bonding
add mode=802.3ad name=Juniper slaves=ether1,ether2

Juniper Configuration boiler Plate || VLAN, eBGP, P2P, Logical system, Firewall Policier, eBGP in/out Filter || Juniper

 Juniper Client Configuration boiler Plate:

set interfaces et-0/0/0 unit 2867 description "Mridha-Corpo-Patuakhali-F@H-IPT"
set interfaces et-0/0/0 unit 2867 vlan-id 2867
set interfaces et-0/0/0 unit 2867 family inet policer input 10MB
set interfaces et-0/0/0 unit 2867 family inet policer output 10MB
set interfaces et-0/0/0 unit 2867 family inet address 172.20.20.29/30

set logical-systems ggc-rt interfaces et-0/0/0 unit 2868 description "Mridha-Corpo-Patuakhali-F@H-GGC"
set logical-systems ggc-rt interfaces et-0/0/0 unit 2868 vlan-id 2868
set logical-systems ggc-rt interfaces et-0/0/0 unit 2868 family inet policer input 10MB
set logical-systems ggc-rt interfaces et-0/0/0 unit 2868 family inet policer output 10MB
set logical-systems ggc-rt interfaces et-0/0/0 unit 2868 family inet address 172.20.24.17/30

set logical-systems fna-rt interfaces et-0/0/0 unit 2869 description "Mridha-Corpo-Patuakhali-F@H-FNA"
set logical-systems fna-rt interfaces et-0/0/0 unit 2869 vlan-id 2869
set logical-systems fna-rt interfaces et-0/0/0 unit 2869 family inet policer input 10MB
set logical-systems fna-rt interfaces et-0/0/0 unit 2869 family inet policer output 10MB
set logical-systems fna-rt interfaces et-0/0/0 unit 2869 family inet address 172.20.28.17/30

set logical-systems bdix-rt interfaces et-0/0/0 unit 2870 description "Mridha-Corpo-Patuakhali-F@H-BDIX"
set logical-systems bdix-rt interfaces et-0/0/0 unit 2870 vlan-id 2870
set logical-systems bdix-rt interfaces et-0/0/0 unit 2870 family inet address 172.20.32.21/30

set logical-systems cdn-rt interfaces et-0/0/0 unit 2871 description "Mridha-Corpo-Patuakhali-F@H-CDN"
set logical-systems cdn-rt interfaces et-0/0/0 unit 2871 vlan-id 2871
set logical-systems cdn-rt interfaces et-0/0/0 unit 2871 family inet policer input 30M
set logical-systems cdn-rt interfaces et-0/0/0 unit 2871 family inet policer output 30M
set logical-systems cdn-rt interfaces et-0/0/0 unit 2871 family inet address 172.20.36.25/30

set policy-options policy-statement "Mridha-Corpo-Patuakhali-F@H-IPT-IN" term 1 from protocol bgp
set policy-options policy-statement "Mridha-Corpo-Patuakhali-F@H-IPT-IN" term 1 from route-filter 103.61.240.130/31 exact
set policy-options policy-statement "Mridha-Corpo-Patuakhali-F@H-IPT-IN" term 1 then accept
set policy-options policy-statement "Mridha-Corpo-Patuakhali-F@H-IPT-IN" term 10 then reject

set protocols bgp group "Mridha-Corpo-Patuakhali-F@H-IPT" neighbor 172.20.20.30 description "Mridha-Corpo-Patuakhali-F@H-IPT"
set protocols bgp group "Mridha-Corpo-Patuakhali-F@H-IPT" neighbor 172.20.20.30 local-address 172.20.20.29
set protocols bgp group "Mridha-Corpo-Patuakhali-F@H-IPT" neighbor 172.20.20.30 import "Mridha-Corpo-Patuakhali-F@H-IPT-IN"
set protocols bgp group "Mridha-Corpo-Patuakhali-F@H-IPT" neighbor 172.20.20.30 export clients-default-out
set protocols bgp group "Mridha-Corpo-Patuakhali-F@H-IPT" neighbor 172.20.20.30 peer-as 64500

set logical-systems ggc-rt policy-options policy-statement "Mridha-Corpo-Patuakhali-F@H-GGC-IN" term 1 from protocol bgp
set logical-systems ggc-rt policy-options policy-statement "Mridha-Corpo-Patuakhali-F@H-GGC-IN" term 1 from route-filter 103.61.240.130/31 exact
set logical-systems ggc-rt policy-options policy-statement "Mridha-Corpo-Patuakhali-F@H-GGC-IN" term 1 then accept
set logical-systems ggc-rt policy-options policy-statement "Mridha-Corpo-Patuakhali-F@H-GGC-IN" term 10 then reject

set logical-systems ggc-rt protocols bgp group "Mridha-Corpo-Patuakhali-F@H-GGC-IN" neighbor 172.20.24.18 description "Mridha-Corpo-Patuakhali-F@H-GGC"
set logical-systems ggc-rt protocols bgp group "Mridha-Corpo-Patuakhali-F@H-GGC-IN" neighbor 172.20.24.18 local-address 172.20.24.17
set logical-systems ggc-rt protocols bgp group "Mridha-Corpo-Patuakhali-F@H-GGC-IN" neighbor 172.20.24.18 import "Mridha-Corpo-Patuakhali-F@H-GGC-IN"
set logical-systems ggc-rt protocols bgp group "Mridha-Corpo-Patuakhali-F@H-GGC-IN" neighbor 172.20.24.18 export clients-ggc-out
set logical-systems ggc-rt protocols bgp group "Mridha-Corpo-Patuakhali-F@H-GGC-IN" neighbor 172.20.24.18 peer-as 64500

set logical-systems fna-rt policy-options policy-statement "Mridha-Corpo-Patuakhali-F@H-FNA-IN" term 1 from protocol bgp
set logical-systems fna-rt policy-options policy-statement "Mridha-Corpo-Patuakhali-F@H-FNA-IN" term 1 from route-filter 103.61.240.130/31 exact
set logical-systems fna-rt policy-options policy-statement "Mridha-Corpo-Patuakhali-F@H-FNA-IN" term 1 then accept
set logical-systems fna-rt policy-options policy-statement "Mridha-Corpo-Patuakhali-F@H-FNA-IN" term 10 then reject

set logical-systems fna-rt protocols bgp group "Mridha-Corpo-Patuakhali-F@H-FNA" neighbor 172.20.28.18 description "Mridha-Corpo-Patuakhali-F@H-FNA"
set logical-systems fna-rt protocols bgp group "Mridha-Corpo-Patuakhali-F@H-FNA" neighbor 172.20.28.18 local-address 172.20.28.17
set logical-systems fna-rt protocols bgp group "Mridha-Corpo-Patuakhali-F@H-FNA" neighbor 172.20.28.18 import "Mridha-Corpo-Patuakhali-F@H-FNA-IN"
set logical-systems fna-rt protocols bgp group "Mridha-Corpo-Patuakhali-F@H-FNA" neighbor 172.20.28.18 export clients-fna-out
set logical-systems fna-rt protocols bgp group "Mridha-Corpo-Patuakhali-F@H-FNA" neighbor 172.20.28.18 peer-as 64500

set logical-systems bdix-rt policy-options policy-statement "Mridha-Corpo-Patuakhali-F@H-BDIX" term 1 from protocol bgp
set logical-systems bdix-rt policy-options policy-statement "Mridha-Corpo-Patuakhali-F@H-BDIX" term 1 from route-filter 103.61.240.130/31 exact
set logical-systems bdix-rt policy-options policy-statement "Mridha-Corpo-Patuakhali-F@H-BDIX" term 1 then accept
set logical-systems bdix-rt policy-options policy-statement "Mridha-Corpo-Patuakhali-F@H-BDIX" term 10 then reject

set logical-systems bdix-rt protocols bgp group "Mridha-Corpo-Patuakhali-F@H-BDIX" neighbor 172.20.32.22 description "Mridha-Corpo-Patuakhali-F@H-BDIX"
set logical-systems bdix-rt protocols bgp group "Mridha-Corpo-Patuakhali-F@H-BDIX" neighbor 172.20.32.22 local-address 172.20.32.21
set logical-systems bdix-rt protocols bgp group "Mridha-Corpo-Patuakhali-F@H-BDIX" neighbor 172.20.32.22 import "Mridha-Corpo-Patuakhali-F@H-BDIX"
set logical-systems bdix-rt protocols bgp group "Mridha-Corpo-Patuakhali-F@H-BDIX" neighbor 172.20.32.22 export BDIX-NEW-OUT
set logical-systems bdix-rt protocols bgp group "Mridha-Corpo-Patuakhali-F@H-BDIX" neighbor 172.20.32.22 peer-as 64500

set logical-systems cdn-rt policy-options policy-statement "Mridha-Corpo-Patuakhali-F@H-CDN" term 1 from protocol bgp
set logical-systems cdn-rt policy-options policy-statement "Mridha-Corpo-Patuakhali-F@H-CDN" term 1 from route-filter 103.61.240.130/31 exact
set logical-systems cdn-rt policy-options policy-statement "Mridha-Corpo-Patuakhali-F@H-CDN" term 1 then accept
set logical-systems cdn-rt policy-options policy-statement "Mridha-Corpo-Patuakhali-F@H-CDN" term 10 then reject

set logical-systems cdn-rt protocols bgp group "Mridha-Corpo-Patuakhali-F@H-CDN" neighbor 172.20.36.26 description "Mridha-Corpo-Patuakhali-F@H-CDN"
set logical-systems cdn-rt protocols bgp group "Mridha-Corpo-Patuakhali-F@H-CDN" neighbor 172.20.36.26 local-address 172.20.36.25
set logical-systems cdn-rt protocols bgp group "Mridha-Corpo-Patuakhali-F@H-CDN" neighbor 172.20.36.26 import "Mridha-Corpo-Patuakhali-F@H-CDN"
set logical-systems cdn-rt protocols bgp group "Mridha-Corpo-Patuakhali-F@H-CDN" neighbor 172.20.36.26 export clients-cdn-out
set logical-systems cdn-rt protocols bgp group "Mridha-Corpo-Patuakhali-F@H-CDN" neighbor 172.20.36.26 peer-as 64500

Monday, 3 July 2023

Installing Pnetlab Network Simulation Software

 Introducing the most powerful tool to create, share and practice Networking Lab with multi-vendors. Free of cost. Let's see the features. It's the best alternative for Eve-NG. You will get all the pro features of eve-ng in Pnetlab. 


For proper Documentation please visit: https://pnetlab.com/pages/documentation 

And for Supported Images visit: https://pnetlab.com/pages/documentation?slug=PNETLab-Supported-Images


To download Pnet lab: Drive Link-1

                                     Drive Link-2

                                     Mega Link


Down load the .OVA file from above link. for open the OVA file you need to install vmware workstation. 


Please download Vmware from given Link: https://mega.nz/folder/k3BCWRRQ#RQrkov94is5_qTS6QU9ZGA/folder/xu5AhYIB


Saturday, 1 July 2023

Installing Cacti-0.8.8f with weathermap in ubuntu-server 16.04 lts server

 First, we need to install a lamp server


To install LAMP, add the following repository as shown below –

sudo add-apt-repository 'deb http://archive.ubuntu.com/ubuntu trusty universe'


To install the lamp server 

sudo apt-get install apache2 mysql-server php libapache2-mod-php

While install lamp it will ask for root password


To install snmpd RRdTool
$ sudo apt-get install snmp snmpd rrdtool


To install Cacti

$sudo apt-get install snmpd cacti cacti-spine

It will ask for setup web server 


Done. open browser and install cacti

http://192.168.9.91/cacti/install/


The default username and password is

User name :admin
Password: admin

Before install any plugin please install php-gd and restart apache web server

apt-get install php-gd
/etc/init.d/apache2 restart


Then download php weather map 0.98a. and extract the zip file. 


Login to your ubuntu server via winscp. and copy the extracted wethermap folder to your ubuntu server /usr/share/cacti/site/plugins/weather map folder


Now go to cacti plugin management and install weathermap plugin.


and then permission to the weathermap config file. 

chmod -R 777 /usr/share/cacti/site/plugins/weathermap/configs


Installing Realtime graph plugin. 


And install same like as Weathermap plugin


Thursday, 29 June 2023

Networking Resources Free

Emulator: 

3. GNS3


ISO/img/qcow2/os/Images 

5. 

Resource Free and Paid

How to setup Open Source Zimbra mail server in Ubuntu Server 20.4 LTS

 Mainly Zima system have some requirements. but if you are trying to install it on a virtual emulation or eve-ng/pnetlab then no need to follow their official requirements. just folow the below steps. 


1. Need a Domain name: I have mail.shaharul.abc

2. Need Domain name record in DNS server 

TypeHostValue
Amail192.168.9.91
MX@mail.shaharul.abc 91
If you setup your dns server as i have posted a dns server setup blog. then no need to setup above configuration. 


Setup Server


Update Repo 

sudo -i
apt update && apt upgrade -y

Set Hostname matched your mail server domain name

hostnamectl set-hostname mail.shaharul.abc
sudo -i

Now edit the host file 

nano /etc/hosts


and paste as below

    127.0.0.1 localhost
    127.0.1.1 mail.shaharul.abc mail
    192.168.9.91 mail.shaharul.abc mail


Next, we need to install Dnsmasq to create and manage a few DNS records required by Zimbra. We also need to disable systemd-resolve in order to avoid conflict between dnsmasq and systemd-resolve


systemctl disable systemd-resolved
systemctl stop systemd-resolved
ls -lh /etc/resolv.conf
rm -f /etc/resolv.conf

Now create your own resolv.conf 


nano /etc/resolv.conf

set name server as below

    nameserver 192.168.9.92


Now install Dnsmasq


apt install dnsmasq -y


Now configure Dnsmasq 

Edit dnsmasq.conf.bak

cp /etc/dnsmasq.conf /etc/dnsmasq.conf.bak
nano /etc/dnsmasq.conf


and paste below content at bottom of the file and change ip and server as your. 

    server= 192.168.9.91
    domain=shaharul.abc
    mx-host= shaharul.abc, mail.shaharul.abc, 5
    mx-host= mail.shaharul.abc, mail.shaharul.abc, 5
    listen-address=127.0.0.1

Now dig the command and see  A record


root@mail:~# dig -t A mail.shaharul.abc
 
; <<>> DiG 9.16.1-Ubuntu <<>> -t A mail.shaharul.abc
;; global options: +cmd
;; Got answer:
;; ->>HEADER<<- opcode: QUERY, status: NOERROR, id: 15272
;; flags: qr rd ra; QUERY: 1, ANSWER: 1, AUTHORITY: 0, ADDITIONAL: 1
 
;; OPT PSEUDOSECTION:
; EDNS: version: 0, flags:; udp: 512
;; QUESTION SECTION:
;mail.shaharul.abc.              IN      A
 
;; ANSWER SECTION:
mail.shaharul.abc.       1799    IN      A       192.168.9.91
 
;; Query time: 31 msec
;; SERVER: 192.168.9.92#53(192.168.9.92)
;; WHEN: Sun Jul 10 14:59:46 CEST 2022
;; MSG SIZE  rcvd: 61


Also check MX record


root@mail:~# dig -t MX shaharul.abc
 
; <<>> DiG 9.16.1-Ubuntu <<>> -t MX shaharul.abc
;; global options: +cmd
;; Got answer:
;; ->>HEADER<<- opcode: QUERY, status: NOERROR, id: 4658
;; flags: qr rd ra; QUERY: 1, ANSWER: 1, AUTHORITY: 0, ADDITIONAL: 1
 
;; OPT PSEUDOSECTION:
; EDNS: version: 0, flags:; udp: 512
;; QUESTION SECTION:
;shaharul.abc.                   IN      MX
 
;; ANSWER SECTION:
shaharul.abc.            1799    IN      MX      91 mail.shaharul.abc.
 
;; Query time: 35 msec
;; SERVER: 192.168.9.92#53(192.168.9.92)
;; WHEN: Sun Jul 10 14:59:05 CEST 2022
;; MSG SIZE  rcvd: 61


Now install zimbra Open source


wget https://files.zimbra.com/downloads/8.8.15_GA/zcs-8.8.15_GA_4179.UBUNTU20_64.20211118033954.tgz
tar xvzf zcs-8.8.15_GA_4179.UBUNTU20_64.20211118033954.tgz
cd zcs-8.8.15_GA_4179.UBUNTU20_64.20211118033954
./install.sh

Now it will ask license agreement and some configuration checkup


Do you agree with the terms of the software license agreement? [N] y
 
Use Zimbra's package repository [Y] y
 
Warning: apt-key output should not be parsed (stdout is not a terminal)
Importing Zimbra GPG key
 
Configuring package repository
 
Checking for installable packages
 
Found zimbra-core (local)
Found zimbra-ldap (local)
Found zimbra-logger (local)
Found zimbra-mta (local)
Found zimbra-dnscache (local)
Found zimbra-snmp (local)
Found zimbra-store (local)
Found zimbra-apache (local)
Found zimbra-spell (local)
Found zimbra-memcached (repo)
Found zimbra-proxy (local)
Found zimbra-drive (repo)
Found zimbra-imapd (local)
Found zimbra-patch (repo)
Found zimbra-mta-patch (repo)
Found zimbra-proxy-patch (repo)
 
Select the packages to install
 
Install zimbra-ldap [Y] y
 
Install zimbra-logger [Y] y
 
Install zimbra-mta [Y] y
 
Install zimbra-dnscache [Y] n
 
Install zimbra-snmp [Y] y
 
Install zimbra-store [Y] y
 
Install zimbra-apache [Y] y
 
Install zimbra-spell [Y] y
 
Install zimbra-memcached [Y] y
 
Install zimbra-proxy [Y] y
 
Install zimbra-drive [Y] n
 
Install zimbra-imapd (BETA - for evaluation only) [N] n
 
Install zimbra-chat [Y] n
Checking required space for zimbra-core
Checking space for zimbra-store
Checking required packages for zimbra-store
zimbra-store package check complete.


The system will be modified.  Continue? [N] y
 
Beginning Installation - see /tmp/install.log.UUJ9kVuj for details...
 
                          zimbra-core-components will be downloaded and installed.
                            zimbra-timezone-data will be installed.
                   zimbra-common-mbox-conf-attrs will be installed.
                          zimbra-common-core-jar will be installed.
                  zimbra-common-mbox-conf-rights will be installed.
                         zimbra-common-core-libs will be installed.
                    zimbra-common-mbox-conf-msgs will be installed.
                           zimbra-common-mbox-db will be installed.
                         zimbra-common-mbox-docs will be installed.
                   zimbra-common-mbox-native-lib will be installed.
                         zimbra-common-mbox-conf will be installed.
                                     zimbra-core will be installed.
                          zimbra-ldap-components will be downloaded and installed.
                                     zimbra-ldap will be installed.
                                   zimbra-logger will be installed.
                           zimbra-mta-components will be downloaded and installed.
                                      zimbra-mta will be installed.
                      zimbra-dnscache-components will be downloaded and installed.
                                 zimbra-dnscache will be installed.
                          zimbra-snmp-components will be downloaded and installed.
                                     zimbra-snmp will be installed.
                         zimbra-store-components will be downloaded and installed.
                       zimbra-jetty-distribution will be downloaded and installed.
                          zimbra-mbox-store-libs will be installed.
                                zimbra-mbox-conf will be installed.
                   zimbra-mbox-admin-console-war will be installed.
                                 zimbra-mbox-war will be installed.
                       zimbra-mbox-webclient-war will be installed.
                             zimbra-mbox-service will be installed.
                                    zimbra-store will be installed.
                        zimbra-apache-components will be downloaded and installed.
                                   zimbra-apache will be installed.
                         zimbra-spell-components will be downloaded and installed.
                                    zimbra-spell will be installed.
                                zimbra-memcached will be downloaded and installed.
                         zimbra-proxy-components will be downloaded and installed.
                                    zimbra-proxy will be installed.
                                    zimbra-patch will be downloaded and installed                                                                                                                                                                                                             (later).
                                zimbra-mta-patch will be downloaded and installed                                                                                                                                                                                                             (later).
                              zimbra-proxy-patch will be downloaded and installed                                                                                                                                                                                                             (later).
 
Downloading packages (11):
   zimbra-core-components
   zimbra-ldap-components
   zimbra-mta-components
   zimbra-dnscache-components
   zimbra-snmp-components
   zimbra-store-components
   zimbra-jetty-distribution
   zimbra-apache-components
   zimbra-spell-components
   zimbra-memcached
   zimbra-proxy-components
      ...done
 
Removing /opt/zimbra
Removing zimbra crontab entry...done.
Cleaning up zimbra init scripts...done.
Cleaning up /etc/security/limits.conf...done.
 
Finished removing Zimbra Collaboration Server.


In the next screen zimbra will ask to set admin password.


Main menu
   1) Common Configuration:
   2) zimbra-ldap:                             Enabled
   3) zimbra-logger:                           Enabled
   4) zimbra-mta:                              Enabled
   5) zimbra-dnscache:                         Enabled
        +Master DNS IP address(es):            yes
        +Enable DNS lookups over TCP:          yes
        +Enable DNS lookups over UDP:          yes
        +Only allow TCP to communicate with Master DNS: no                        
   6) zimbra-snmp:                             Enabled
   7) zimbra-store:                            Enabled
        +Create Admin User:                    yes
        +Admin user to create:                 admin@mail.shaharul.abc
******* +Admin Password                        UNSET
        +Anti-virus quarantine user:           virus-quarantine.c73xqgvr@mail.shaharul.abc
        +Enable automated spam training:       yes
        +Spam training user:                   spam.g1kkn_0g6l@mail.shaharul.abc
        +Non-spam(Ham) training user:          ham.tzkyhmqk2a@mail.shaharul.abc
        +SMTP host:                            mail.shaharul.abc
        +Web server HTTP port:                 8080
        +Web server HTTPS port:                8443
        +Web server mode:                      https
        +IMAP server port:                     7143
        +IMAP server SSL port:                 7993
        +POP server port:                      7110
        +POP server SSL port:                  7995
        +Use spell check server:               yes
        +Spell server URL:                     http://mail.shaharul.abc:7780/aspell.php
        +Enable version update checks:         TRUE
        +Enable version update notifications:  TRUE
        +Version update notification email:    admin@mail.shaharul.abc
        +Version update source email:          admin@mail.shaharul.abc
        +Install mailstore (service webapp):   yes
        +Install UI (zimbra,zimbraAdmin webapps): yes
   8) zimbra-spell:                            Enabled
   9) zimbra-proxy:                            Enabled
  10) Default Class of Service Configuration:
   s) Save config to file
   x) Expand menu
   q) Quit5


select 7 by answering 7 like below


Address unconfigured (**) items  (? - help) 7
 
 
Store configuration
 
   1) Status:                                  Enabled
   2) Create Admin User:                       yes
   3) Admin user to create:                    admin@mail.inguide.in
** 4) Admin Password                           UNSET
   5) Anti-virus quarantine user:              virus-quarantine.3liys4nw@mail.inguide.in
   6) Enable automated spam training:          yes
   7) Spam training user:                      spam.cfzvesa2d5@mail.inguide.in
   8) Non-spam(Ham) training user:             ham.ofijq5m5@mail.inguide.in
   9) SMTP host:                               mail.inguide.in
  10) Web server HTTP port:                    8080
  11) Web server HTTPS port:                   8443
  12) Web server mode:                         https
  13) IMAP server port:                        7143
  14) IMAP server SSL port:                    7993
  15) POP server port:                         7110
  16) POP server SSL port:                     7995
  17) Use spell check server:                  yes
  18) Spell server URL:                        http://mail.inguide.in:7780/aspell.php
  19) Enable version update checks:            TRUE
  20) Enable version update notifications:     TRUE
  21) Version update notification email:       admin@mail.inguide.in
  22) Version update source email:             admin@mail.inguide.in
  23) Install mailstore (service webapp):      yes
  24) Install UI (zimbra,zimbraAdmin webapps): yes

select 4 by answering 4 like below and apply


Select, or 'r' for previous menu [r] 4

Password for admin@mail.inguide.in (min 6 characters): password
 
Store configuration
 
   1) Status:                                  Enabled
   2) Create Admin User:                       yes
   3) Admin user to create:                    admin@mail.inguide.in
   4) Admin Password                           set
   5) Anti-virus quarantine user:              virus-quarantine.3liys4nw@mail.inguide.in
   6) Enable automated spam training:          yes
   7) Spam training user:                      spam.cfzvesa2d5@mail.inguide.in
   8) Non-spam(Ham) training user:             ham.ofijq5m5@mail.inguide.in
   9) SMTP host:                               mail.inguide.in
  10) Web server HTTP port:                    8080
  11) Web server HTTPS port:                   8443
  12) Web server mode:                         https
  13) IMAP server port:                        7143
  14) IMAP server SSL port:                    7993
  15) POP server port:                         7110
  16) POP server SSL port:                     7995
  17) Use spell check server:                  yes
  18) Spell server URL:                        http://mail.inguide.in:7780/aspell.php
  19) Enable version update checks:            TRUE
  20) Enable version update notifications:     TRUE
  21) Version update notification email:       admin@mail.inguide.in
  22) Version update source email:             admin@mail.inguide.in
  23) Install mailstore (service webapp):      yes
  24) Install UI (zimbra,zimbraAdmin webapps): yes


Select, or 'r' for previous menu [r] r
 
Main menu
 
   1) Common Configuration:
   2) zimbra-ldap:                             Enabled
   3) zimbra-logger:                           Enabled
   4) zimbra-mta:                              Enabled
   5) zimbra-dnscache:                         Enabled
   6) zimbra-snmp:                             Enabled
   7) zimbra-store:                            Enabled
   8) zimbra-spell:                            Enabled
   9) zimbra-proxy:                            Enabled
  10) Default Class of Service Configuration:
   s) Save config to file
   x) Expand menu
   q) Quit
 
*** CONFIGURATION COMPLETE - press 'a' to apply
Select from menu, or press 'a' to apply config (? - help) a
Save configuration data to a file? [Yes]
Save config in file: [/opt/zimbra/config.21298]
Saving config in /opt/zimbra/config.21298...done.
The system will be modified - continue? [No] yes


Now zimbra will ask to notify zimbra about your installation info. simply type yes


and then allow all the port related mail in firewall.

ufw allow 25,80,110,143,443,465,587,993,995,5222,5223,9071,7071/tcp


Everything is done. 

Now try to log in to your Mail console via

        https://mail.shaharul.abc:7071
        Username: admin
        Password: your chosen password


and for your mail login 

        https://mail.shaharul.abc
        Username: admin@mail.shaharul.abc
        Password: your chosen password


Building a Radius Server with Web GUI for Login Mikrotik Routers

  Building a Powerful RADIUS Server with FreeRADIUS and Django for MikroTik Devices If you're managing MikroTik routers and network acc...