Sunday, 26 May 2024

Overview About OSPF | Networking CCNA

OSPF (Open Shortest Path First) is a dynamic routing protocol used in computer networks. The Open Shortest Path First (OSPF) protocol is classified as an Interior Gateway Protocol (IGP). It is utilized to determine the optimal routing path between a source and destination router by implementing the shortest path first (SPF) algorithm. OSPF Protocol is a link-state routing protocol where the routers exchange topology information with their closest neighbors and also use the Dijkstra algorithm to determine the optimal path in the network. It's fast, scalable, and widely used in large networks for its ability to adapt to changes quickly

How OSPF works:

  • Neighbor Discovery: Routers running OSPF discover and establish adjacencies with neighboring routers by exchanging Hello packets. This forms neighbor relationships, allowing routers to share routing information.

  • Topology Exchange: Once neighbor relationships are established, routers exchange Link State Advertisements (LSAs) containing information about the network topology, including reachable networks and associated costs.

  • Building the Topology Database: Each router collects LSAs from neighboring routers and builds a complete map of the network topology, known as the Link State Database (LSDB).

  • Shortest Path Calculation: Using the LSDB, each router independently calculates the shortest path to every network in the OSPF domain using the Dijkstra algorithm. This results in a Shortest Path Tree (SPT) rooted at the router.

  • Routing Table Generation: Based on the shortest path calculations, routers populate their Routing Tables with entries indicating the best path to each destination network, including the next-hop router and outgoing interface.

  • Dynamic Updates and Convergence: OSPF routers continuously monitor the network for changes. Upon detecting a change, such as a link failure or addition, routers quickly update their LSAs and recalculate the shortest paths, ensuring fast convergence and efficient routing in response to network changes.

OSPF makes three type of tables:

  1. Neighbor Table: Keeps track of neighboring routers and their states.
  2. Topology Table (LSDB): Stores network topology information received from LSAs.
  3. Routing Table: Determines the best path to reach destination networks.
There are different types of OSPF areas, such as:
  1. Backbone Area: The backbone area, also referred to as area0 or area 0.0.0.0, constitutes the fundamental component of an OSPF network, serving as the central point of connection for all other network areas. It distributes routing information among non-backbone area types.
  2. Standard area: This is a regular area that can have any area ID other than 0. It can only connect to the backbone area or another standard area through an ABR (Area Border Router).
  3. Stub Area: Stud Area relies fully on a default route for its routing needs. This is a special area that does not receive external routes from other AS.
  4. Not So Stubby Areas: NSSA can import external AS routes and send them to another area. However, it’s not possible to receive external routes of AS from any other areas.
  5. Totally stubby area: This is another variation of the stub area that does not receive any external routes or inter-area routes from other areas. It only has a default route to the backbone area through an ABR.
OSPF Router Types:
  1. Internal Routers: All Interfaces are in single area
  2. Backbone Routers: At least one interface in Area 0
  3. ABR (Area Border Routers): 
    • Interfaces are in Area 0 and another Area
    • Maintain an LSDB for each Area
    • Summarize LSAs between Areas
  4. ASBR (Autonomous System Border Routers): Redistributing foreign routes in OSPF

The main states of OSPF are:

  • Down: The initial state when a router has no information about a neighbor or a network.
  • Init: The state when a router has received a hello packet from a neighbor but has not established bidirectional communication yet.
  • Two-way: The state when a router has established bidirectional communication with a neighbor but has yet to decide whether to exchange routing information or not. And the DR and BDR election processed.
    • DR and BDR elections – DR and BDR elections are done in broadcast or multi-access networks. Selection criteria are given below:
      • The higher the router priority of a router, the higher priority, DR it will be declared.
      • In router priority, the larger route should be considered if there is a tie. (Then router id or overactive IP address on the router’s interface is considered when no loopback is configured. Otherwise, the highest loopback address is considered before the overactive IP address).
  • Exstart: The state when a router has decided to exchange routing information with a neighbor and has negotiated the master-slave relationship and the initial sequence number.
  • Exchange: The state when a router exchanges DBD packets with a neighbor to synchronize their LSDBs.
  • Loading: The state when a router requests and receives more details about LSAs from a neighbor using LSR, LSU, and LSAck packets.
  • Full: The final state when a router has synchronized its LSDB with a neighbor and is ready to forward packets.

There are five types of messages used in OSPF Protocol –

  1. Hello: The Hello is used to create neighborhood relationships and analyze the proximity of neighbors. It means that “Hello” is necessary to establish a connection between routers.
  2. Database description: After making a connection, when the neighboring router wants to communicate with the system for the first time. It transmits the information to the database for network topology to the system; through this, the system can update or make changes accordingly.
  3. Link State Request: The router sends a link-state request to obtain information about the specified route. For example, Router 1 wants information about Router 2, so Router 1 shares a link-state request with Router 2. If Router 2 receives a link-state request, it sends link-state information to Router 1.
  4. Link State Update: The router uses link-state updates to announce the status of the link. When a route needs to broadcast the state of its link, it uses link-state updates.
  5. Link-State Acknowledgment: With link-state acknowledgment, routing is more reliable by forcing each node to share an acknowledgment on each link-state update. For example, Router A shares a link-state update with Routers B and C. In response, Router B and C share a link-state acknowledgment to Router A, thereby notifying Router A that both routers have received the link-state update.

OSPF has several benefits that make it a popular routing protocol, such as:

  1. It can scale to large and complex networks by using hierarchical design, areas, and route summarization.
  2. It supports variable-length subnet masking (VLSM) and classless inter-domain routing (CIDR), which allow more efficient use of IP addresses and reduce the size of routing tables.
  3. Quicker detection and restoration from a link or node failures are made possible by OSPF’s support for fast reroute (FRR) and bidirectional forwarding detection (BFD).
  4. It can support different types of networks, such as broadcast, non-broadcast, point-to-point, point-to-multipoint, and virtual links.
  5. It supports different types of traffic, such as unicast, multicast, and anycast.
  6. It is an open standard that is widely implemented by different vendors and devices.

Here are the three OSPF intervals with their default values:

  1. Hello Interval:

    • Default: 10 seconds on broadcast and point-to-point links.
    • Default: 30 seconds on non-broadcast multi-access (NBMA) networks.
  2. Dead Interval:

    • Default: Four times the Hello Interval.
    • Default: 40 seconds on broadcast and point-to-point links.
    • Default: 120 seconds on NBMA networks.
  3. Retransmit Interval:

    • Default: 5 seconds.
    • This interval defines how often OSPF routers retransmit LSAs (Link State Advertisements) that have not been acknowledged by neighbors.

These intervals are crucial for neighbor discovery, failure detection, and maintaining the consistency of OSPF routing information.

OSPF (Open Shortest Path First) supports different network types, Each OSPF network type has its own considerations for neighbor relationships, DR/BDR election, and routing updates, ensuring flexibility and scalability in OSPF deployments. Here's the network types:

  1. Point-to-Point (P2P): Direct link between two routers, automatic adjacency formation.
  1. Broadcast: Ethernet LANs, elects DR/BDR for reduced control traffic.
  2. Non-Broadcast Multi-Access (NBMA): Like Frame Relay, manual adjacencies or Next-Hop resolution.
  3. Point-to-Multipoint (P2MP): Multipoint network, no DR/BDR, efficient for hub-and-spoke topologies.
  4. Point-to-Multipoint Non-Broadcast (P2MP NBMA): Similar to P2MP, operates over NBMA networks like Frame Relay, requires manual adjacencies.

What included in Hello packet?
  1. Router ID: Identity of each router. 32 bit in ip address format but not ip address.
  2. Hello Interval: Frequency of periodic hello's
  3. Dead Interval: Duration to remember neighbor. Typically 4x of hello interval
  4. Neighbors: Neighbors router ID on link. Validates two way reachability.
  5. Area ID: OSPF area id, Interface belongs to the area.
  6. Authentication Data: Password restricted peering.
  7. Network Mask: Subnet mask for link.
Additional Items in hello packet:
  1. Area Type: Normal, Stub, NSSA
  2. DR
  3. BDR
  4. Priority: 0-255. Default-1
What will happened if no Router ID declared in the router?

In OSPF (Open Shortest Path First), the Router ID (RID) is a crucial identifier for each OSPF router. If no Router ID is explicitly configured, OSPF will automatically select one based on the following criteria:
  1. Highest IP Address on a Logical/Loopback Interface:

    • If the router has one or more loopback interfaces configured with IP addresses, OSPF will choose the highest IP address among those loopback interfaces as the Router ID.
  2. Highest IP Address on a Physical Interface:

    • If no loopback interfaces are configured, OSPF will choose the highest IP address on any of the router's active physical interfaces.

Friday, 17 May 2024

Introducing Our Comprehensive Vsol GPON OLT Support Portal || Network Automation

Managing and troubleshooting Optical Line Terminals (OLTs) and Optical Network Units (ONUs) can be a challenging task for any support or helpdesk team. That's why we are excited to introduce our fully automated OLT Support Portal, designed to simplify and streamline these processes.


Key Features of Our OLT Support Portal

Our OLT Support Portal is packed with features that enhance the efficiency and effectiveness of network management:

1. POP Information Management

  • Add, Update, and Delete POP Information: Users can easily manage Points of Presence (POP) information, ensuring that all network details are up-to-date and accurate.

2. OLT Management

  • Add, Update, and Delete OLTs: Seamlessly manage your OLTs with options to add new devices, update existing ones, or remove them from the network.
  • OLT Status Monitoring: Keep track of the operational status of all OLTs within the network, ensuring they are functioning optimally.
  • OLT Troubleshooting: Diagnose and resolve issues with OLTs quickly, minimizing downtime and improving network reliability.

3. ONU Management

  • ONU Status Monitoring: Check the status of ONUs to ensure they are connected and operating correctly.
  • ONU Reboot: Remotely reboot ONUs to resolve connectivity issues without the need for physical access.
  • ONU RX Power Check: Monitor the received optical power levels to ensure they are within acceptable ranges.
  • ONU VLAN Configuration: Configure VLANs on ONUs to maintain efficient and secure network segmentation.
  • ONU LAN Port Status: View the status of LAN ports on ONUs to ensure proper device connectivity.
  • ONU Learned MAC Check: Check the MAC addresses learned on ONU LAN ports to verify connected devices.
  • ONU Last Log: Access the latest logs from ONUs to troubleshoot and resolve issues effectively.

4. Customer Management

  • Add, Update, and Delete Customer Information: Manage customer details with ease, keeping your records accurate and up-to-date.

Benefits of Using Our Portal

  • Automation: Our portal automates many network management tasks, reducing the workload on your support team and minimizing human error.
  • Efficiency: With comprehensive features and easy-to-use interfaces, your team can resolve issues faster and with greater accuracy.
  • Reliability: Proactive monitoring and troubleshooting tools help maintain network stability and performance.
  • Scalability: Whether you manage a small network or a large one, our portal scales to meet your needs.

Conclusion

Our OLT Support Portal is a powerful tool designed to empower your helpdesk or support team. By simplifying the management and troubleshooting of OLTs and ONUs, it allows your team to focus on delivering exceptional service and maintaining a high-performing network. Try it out and experience the difference it can make in your network operations.

Friday, 10 May 2024

Vlan Extract from VSOL and CDATA Gpon OLT || OLT Automation with python

No Need anything to be install in your pc. Just download the exe file from given drive link. 

Download Link: Drive Link


Simply double click on it. Give ip, username and password. Then rest of the work will do python to extract all the vlan that are in your olt database. Demo Output given below


Give the username and password here. I have shown mine.


 Here's mine all the vlan id's that are in olt database is showing here with range also. If you found it help-full don't forget to share with other's

Friday, 19 April 2024

Fun with MikroTik using Python || Automate Everything

Fun with MikroTik put all commands and router's ip in a text file and run the script.


It's really boring work to do some specific same configuration that need to do in all the mikrotik. Like creating user, creating  queue, creating filter rules, mangle rules, address list adding, raw filter, ip pool, log configure, time zone, ntp etc much more. Individually need to login a mikrotik router via winbox/ssh/telnet.


Python gives us better solution. 

Demo given below and script Google drive download link:  Script Drive Link


Just download and install python version 3.10.0.  And install netmiko packege/module verision 4.3.0 using pip command. See python documentation or my previous blogpost.


Create a new folder name Mikrotik Automation.  inside folder create files like below


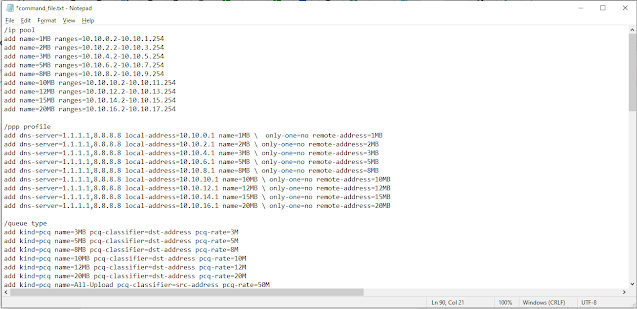
In command_file.txt please put all the command that you want to execute in all the mikrotik router. I have added some commands 

    1. ip pool
    2. PPPoE Profile
    3. Firewall mange rule
    4. Firewall Filter rule for invalid syn,fin,ack, Filter rule for drop Brute Force             Attack, port  scanner, ssh attack,  address list, 
    5. User Creation
    6. Ip services configure
    7. Log Configure
    8. Queue type and Simple Queue configure
    9. Clock, Time zone, Traffic-flow
    10. Graphing

Command_file.txt contains 91 of command that will execute like below


In the host_file.txt add all the mikrotik router loopback ip's.  I have added some ip address of my lab mikrotik router 


Almost Eleven router there i will automate the above configuration. In host_file contains like this.


In Fun-with-mikrotik.py file paste below code and save


from netmiko import ConnectHandler
import time
def main():
    username = input('Please Enter Username: ')
    password = input('Please Enter Password: ')
    # Define device parameters
    with open('host_file.txt', 'r') as file:
        host_addresses = file.readlines()
    
    # Read commands from the text file
    with open('command_file.txt', 'r') as file:
        commands = file.readlines()
    
    mikrotik = {
        'device_type': 'mikrotik_routeros',
        'username': username,
        'password': password,
    }
    
    # Establish SSH connection
    for host in host_addresses:
        mikrotik['host'] = host.strip()
        try:
            with open('log.txt', 'a') as log_file:  # Open log file in append mode
                with ConnectHandler(**mikrotik) as net_connect:
                    # Send commands to the router
                    output = net_connect.send_config_set(commands)
                    time.sleep(10)
                    print(f'Commands executed at: {host.strip()}')
                    log_file.write(f'Commands executed at: {host.strip()}\n')
        except Exception as e:
            with open('log.txt', 'a') as log_file:  # Open log file in append mode
                log_file.write(f'Error executing commands at: {host.strip()}\n')
                print("An error occurred:", e)
if __name__ == "__main__":
    main()
    input('Press enter to close.')


Double Click on the file to execute. And enter username and password of your mikrotik. Here mine is admin/admin


Just wait 2 minutes. And you will see the output like this. 


Don't worry those ip's are not reachable the script will notify you by loggin all the log in log.txt file. Contains all the log like below


If this blogpost found helpfull don't forget to share with other's. For any help can contact any time.

Thursday, 18 April 2024

Mikrotik Automation With Python || Automate Everything


Tricky python script to get all the ip addresses with interface name that statically added in the mikrotik. 

Output:


Requirements:
    1. Python Version: Python 3.10.0
    2. Paramiko Package/Module:  Paramiko 3.4.0
    3. Pip Version: Pip 21.2.3

Download Python from python official page install: Python-3.10.0


While install don't forget to tick on Add to variable path


After install open cmd and run command verify python version

                    C:\Users\shaharul.islam>python --version
            Python 3.10.0

Then install paramiko package using below command:

        C:\Users\shaharul.islam> pip install paramiko


Create a new file with extension .py  mikrotik.py 

Paste below script and save. Google Drive Link : Mikrotik-SSH.py


import paramiko
import re


def ssh_connect(hostname, username, password):
    try:
        # Create SSH client
        ssh_client = paramiko.SSHClient()
        ssh_client.set_missing_host_key_policy(paramiko.AutoAddPolicy())
        # Connect to the SSH server
        ssh_client.connect(hostname, username=username, password=password,timeout=6) 
        # Return the SSH client object
        return ssh_client
    except paramiko.AuthenticationException as e:
        print("Authentication failed:", e)
    except paramiko.SSHException as e:
        print("SSH connection failed:", e)
    except paramiko.BadHostKeyException as e:
        print("Host key could not be verified:", e)
    except Exception as e:
        print("An error occurred:", e)
        # Handle other exceptions here
        # For example, network errors, connection timeout, etc.

def main():
    hostname = input("Enter Mikrotik Router IP: " )
    username = 'admin'
    password = ''

    mt_ssh = ssh_connect(hostname, username, password)
    if mt_ssh:
        #command here
        stdin, stdout, stderr = mt_ssh.exec_command('ip address export')

        # Regular expression pattern to match IP address, interface, and disable status
        ip_interface_pattern = r'add\s+address=(\d+\.\d+\.\d+\.\d+(/\d+)?\b)\s+(?:comment=\S+\s+)?(?:disabled=(\w+)\s+)?interface=(\S+)\s+(?:network=\d+\.\d+\.\d+\.\d+/\d+\s+)?'

        # Process each line of the command output
        for line in stdout:
            output_line = line.strip()
            
            # Skip lines that don't start with "add address"
            if not output_line.startswith("add address"):
                continue
            
            # Find matches in the current line
            match = re.match(ip_interface_pattern, output_line)
            
            # Print the result if a match is found
            if match:
                ip_address = match.group(1)
                disabled_status = match.group(3) if match.group(3) else "no"
                interface = match.group(4)
                print(f"IP Address: {ip_address}, Interface: {interface}, Disabled: {disabled_status}")
                mt_ssh.close()

if __name__ == "__main__":
    main()
    input("Press enter to close")


N.B: Python code is indent sensitive. So before every line of code ensure proper indent. Above code is perfectly described by given comment before line start. Router username and password predefined in code. 


Save and run it simply double click on the file.

Enter Mikrotik router ip address:


And the output is given below


Let's verify the ip addresses. I have already added some ip addresses before creating this script. After login router let's see ip addresses.


By Modifying above code can make power full script to make mikrotik automation. Here's just given an example. If you have big network with mikrotik. you can find which IP address used in which mikrotik simply modifying above script.

Also modifying above code you can done Specific task that need to create in multiple router. If this post found help full then don't forget to share with other's. Need help you can ask....


Sunday, 7 April 2024

Wireguard VPN configure in mikrotik router os 7

 Wireguard VPN configure in mikrotik router os 7


First Create a wireguard logical interface

    /interface wireguard
  add listen-port=13231 mtu=1420 name=wireguard1

Or


Then add a ip address in wireguard interface.

    /ip address
   add address=10.10.10.1/24 interface=wireguard1 network=10.10.10.0


Or


Then as usual create masqurade or src-nat nat rule and DNS.

    /ip dns
    set servers=8.8.8.8
    /ip firewall nat
    add action=masquerade chain=srcnat
    

Now Create peer configuration

    /interface wireguard peers
    add allowed-address=10.10.10.2/32 interface=wireguard1 public-       key="Peer Public Key"


Now configure in wireguard client device and configure as below for android down from google play store and for windows : Download or visit https://www.wireguard.com/install/


Friday, 2 February 2024

Fast and Speedtest reday script || Mikrotik

Fast and Speedtest reday script

/ip firewall address-list

add address=10.0.0.0/8 list=Client-IP

add address=103.103.42.0/24 list=Fast-Speedtest

add address=103.125.178.0/24 list=Fast-Speedtest

add address=42.201.253.0/24 list=Fast-Speedtest

add address=103.135.44.0/24 list=Fast-Speedtest

add address=118.107.138.0/24 list=Fast-Speedtest

add address=103.113.100.0/24 list=Fast-Speedtest

add address=203.135.29.0/24 list=Fast-Speedtest

add address=115.167.73.0/24 list=Fast-Speedtest

add address=202.69.12.0/24 list=Fast-Speedtest

add address=58.65.177.0/24 list=Fast-Speedtest

add address=103.55.68.0/24 list=Fast-Speedtest

add address=58.65.171.0/24 list=Fast-Speedtest

add address=103.12.198.98 list=Fast-Speedtest

add address=182.176.176.0/24 list=Fast-Speedtest

add address=119.30.107.0/24 list=Fast-Speedtest

add address=115.186.185.0/24 list=Fast-Speedtest

add address=23.246.54.0/23 list=Fast-Speedtest

add address=54.154.202.0/23 list=Fast-Speedtest

add address=45.57.50.0/23 list=Fast-Speedtest

add address=198.38.114.0/23 list=Fast-Speedtest

add address=103.15.246.3 list=Fast-Speedtest

add address=151.101.10.219 list=Fast-Speedtest

add address=23.74.247.112 list=Fast-Speedtest

add address=103.15.40.4 list=Fast-Speedtest

add address=203.76.99.30 list=Fast-Speedtest

add address=103.58.73.2 list=Fast-Speedtest

add address=119.18.150.8 list=Fast-Speedtest

add address=103.15.164.23 list=Fast-Speedtest

add address=103.43.148.67 list=Fast-Speedtest

add address=192.168.10.2 list=Fast-Speedtest

add address=118.179.75.213 list=Fast-Speedtest

add address=123.253.37.2 list=Fast-Speedtest

add address=182.160.96.0/24 list=Fast-Speedtest

add address=103.15.40.0/24 list=Fast-Speedtest

add address=103.213.237.62 list=Fast-Speedtest

add address=210.176.156.49 list=Fast-Speedtest

add address=210.176.156.48 list=Fast-Speedtest

add address=151.101.54.114 list=Fast-Speedtest

add address=151.101.42.114 list=Fast-Speedtest

add address=151.101.10.214 list=Fast-Speedtest

add address=151.101.26.114 list=Fast-Speedtest

add address=151.101.0.143 list=Fast-Speedtest

add address=151.101.0.84 list=Fast-Speedtest

add address=125.56.237.3 list=Fast-Speedtest

add address=104.84.156.138 list=Fast-Speedtest

add address=59.151.128.157 list=Fast-Speedtest

add address=23.219.132.176 list=Fast-Speedtest

add address=23.198.124.11 list=Fast-Speedtest

add address=23.77.26.81 list=Fast-Speedtest

add address=182.79.223.0/24 list=Fast-Speedtest

add address=23.9.187.175 list=Fast-Speedtest

add address=52.33.112.234 list=Fast-Speedtest

add address=52.41.203.109 list=Fast-Speedtest

add address=69.173.159.0/24 list=Fast-Speedtest

add address=104.79.117.49 list=Fast-Speedtest

add address=104.118.129.134 list=Fast-Speedtest

add address=104.122.15.153 list=Fast-Speedtest

add address=104.122.11.167 list=Fast-Speedtest

add address=104.122.8.110 list=Fast-Speedtest

add address=104.121.255.145 list=Fast-Speedtest

add address=speedtest.net list=Fast-Speedtest

add address=Fast-Speedtest list=Fast-Speedtest

add address=151.101.1.130 list=Fast-Speedtest

add address=184.26.196.191 list=Fast-Speedtest

add address=173.239.53.18 list=Fast-Speedtest

add address=151.101.196.64 list=Fast-Speedtest

add address=151.101.193.21 list=Fast-Speedtest

add address=151.101.10.208 list=Fast-Speedtest

add address=151.101.10.109 list=Fast-Speedtest

add address=151.101.9.108 list=Fast-Speedtest

add address=151.101.2.133 list=Fast-Speedtest

add address=151.101.2.110 list=Fast-Speedtest

add address=151.101.2.109 list=Fast-Speedtest

add address=151.101.1.186 list=Fast-Speedtest

add address=23.74.243.73 list=Fast-Speedtest

add address=34.208.20.104 list=Fast-Speedtest

add address=35.172.96.212 list=Fast-Speedtest

add address=192.229.237.182 list=Fast-Speedtest

add address=151.101.65.21 list=Fast-Speedtest

add address=151.101.129.21 list=Fast-Speedtest

add address=151.101.10.2 list=Fast-Speedtest

add address=151.101.8.81 list=Fast-Speedtest

add address=151.101.2.114 list=Fast-Speedtest

add address=128.1.97.163 list=Fast-Speedtest

add address=104.118.121.11 list=Fast-Speedtest

add address=199.232.237.51 list=Fast-Speedtest

add address=151.101.126.91 list=Fast-Speedtest

add address=151.101.114.91 list=Fast-Speedtest

add address=151.101.130.91 list=Fast-Speedtest

add address=151.101.2.91 list=Fast-Speedtest

add address=151.101.1.42 list=Fast-Speedtest

add address=182.79.164.0/24 list=Fast-Speedtest

add address=23.47.232.222 list=Fast-Speedtest

add address=52.42.104.145 list=Fast-Speedtest

add address=52.41.214.164 list=Fast-Speedtest

add address=118.215.155.65 list=Fast-Speedtest

add address=44.233.205.57 list=Fast-Speedtest

add address=35.155.65.240 list=Fast-Speedtest

add address=100.20.17.138 list=Fast-Speedtest

add address=202.150.221.0/24 list=Fast-Speedtest

add address=182.79.161.0/24 list=Fast-Speedtest

add address=182.79.245.0/24 list=Fast-Speedtest

add address=182.79.160.0/22 list=Fast-Speedtest

add address=182.79.164.0/22 list=Fast-Speedtest

add address=45.57.50.0/24 list=Fast-Speedtest

add address=45.57.51.0/24 list=Fast-Speedtest

add address=108.159.58.0/24 list=Fast-Speedtest

add address=69.173.158.0/24 list=Fast-Speedtest

add address=182.79.164.2 list=Fast-Speedtest

add address=182.79.164.165 list=Fast-Speedtest

add address=182.79.164.55 list=Fast-Speedtest

add address=182.79.164.6 list=Fast-Speedtest

add address=182.79.161.233 list=Fast-Speedtest

add address=45.57.51.140 list=Fast-Speedtest

add address=182.79.223.234 list=Fast-Speedtest

add address=45.57.50.142 list=Fast-Speedtest

add address=182.79.223.230 list=Fast-Speedtest

add address=45.57.51.146 list=Fast-Speedtest

add address=45.57.50.150 list=Fast-Speedtest

add address=45.57.51.153 list=Fast-Speedtest

add address=23.246.55.163 list=Fast-Speedtest

add address=45.57.51.142 list=Fast-Speedtest

add address=49.44.61.0/24 list=Fast-Speedtest

add address=103.87.204.0/22 list=Fast-Speedtest

add address=23.246.0.0/18 list=Fast-Speedtest

add address=45.57.0.0/17 list=Fast-Speedtest

add address=37.77.184.0/21 list=Fast-Speedtest

add address=64.120.128.0/17 list=Fast-Speedtest

add address=108.175.32.0/20 list=Fast-Speedtest

add address=185.2.220.0/22 list=Fast-Speedtest

add address=185.9.188.0/22 list=Fast-Speedtest

add address=35.0.0.0/8 list=Fast-Speedtest

add address=182.79.0.0/16 list=Fast-Speedtest

add address=52.35.0.0/16 list=Fast-Speedtest

add address=23.246.0.0/16 list=Fast-Speedtest

add address=37.77.184.0/21 list=Fast-Speedtest

add address=45.57.0.0/17 list=Fast-Speedtest

add address=64.120.128.0/17 list=Fast-Speedtest

add address=66.197.128.0/17 list=Fast-Speedtest

add address=185.2.220.0/22 list=Fast-Speedtest

add address=185.9.188.0/22 list=Fast-Speedtest

add address=198.9.188.0/22 list=Fast-Speedtest

add address=198.38.96.0/19 list=Fast-Speedtest

add address=182.79.223.0/24 list=Fast-Speedtest

add address=182.79.164.0/24 list=Fast-Speedtest

add address=61.8.176.0/20 list=Fast-Speedtest

add address=199.58.164.0/22 list=Fast-Speedtest

add address=131.161.168.0/22 list=Fast-Speedtest

add address=103.101.59.0/24 list=Fast-Speedtest

add address=103.102.42.0/23 list=Fast-Speedtest

add address=23.77.0.0/18 list=Fast-Speedtest

add address=23.246.0.0/18 list=Fast-Speedtest


/ip firewall mangle


add action=mark-packet chain=forward dst-address-list=Fast-Speedtest new-packet-mark=fast-upload passthrough=no src-address-list=Client-IP

add action=mark-packet chain=forward dst-address-list=Client-IP new-packet-mark=fast-download passthrough=no src-address-list=Fast-Speedtest


/queue type

add kind=pcq name=fast-upload pcq-classifier=src-address pcq-dst-address6-mask=64 pcq-rate=30M pcq-src-address6-mask=64

add kind=pcq name=fast-download pcq-classifier=dst-address pcq-dst-address6-mask=64 pcq-rate=30M pcq-src-address6-mask=64


/queue simple

add name="Fast-Upload-bdix" dst=HTL-BDIX packet-marks=fast-upload queue=fast-upload/fast-download target=""

add name="Fast-Download-bdix" dst=HTL-BDIX packet-marks=fast-download queue=fast-upload/fast-download target=""

/queue simple

add name="Fast-Upload" dst=HTL-INT packet-marks=fast-upload queue=fast-upload/fast-download target=""

add name="Fast-Download" dst=HTL-INT packet-marks=fast-download queue=fast-upload/fast-download target=""

Building a Radius Server with Web GUI for Login Mikrotik Routers

  Building a Powerful RADIUS Server with FreeRADIUS and Django for MikroTik Devices If you're managing MikroTik routers and network acc...